The Microsoft 365 E5 suite is essentially a large amount of the products Microsoft offers for the Enterprise environment, more so focused towards the security and compliance areas. The purchasing of E5 licensing means an organization now has unlocked a lot of Microsoft products and the common question seen afterwards is, “where do I start?”
Many products overlap across E3 and E5, so this blog will take the assumption that an organization has been an E3 client, but has now upgraded to full E5. You can see a wonderful break down in a clear table view on this page.
E5 Unlocked
The following is the current list of products that unlock at the E5 level:
- Azure Active Directory (AAD) Premium 2
- Microsoft Defender Advanced Threat Protection (MDATP)
- Now known as Microsoft Defender for Endpoint
- Office 365 Advanced Threat Protection (Office ATP)
- Now known as Microsoft Defender for Office 365
- Azure Advanced Threat Protection (Azure ATP)
- Now known as Microsoft Defender for Identity
- Azure Information Protection P2 (AIP)
- Microsoft Cloud App Security (MCAS)
- Advanced Compliance (eDiscovery)
- Audio Conferencing
- Phone System
- Power BI Pro
Of this list of products, this blog post will focus on everything but the last three bullet points. The audio conferencing, phone system, and Power BI Pro product lines are all unique, where implementation can run parallel and typically through different teams. This blog is also an opinion and is not going to cover every single feature of what is available to an E5 customer. There are many other features that will need to be researched and reviewed as your organization matures its implementation of E5.
Now that you are an E5 customer, the first thing to get familiar with is the Microsoft Threat Protection Portal (MTP). This is the one unified portal that Microsoft is condensing all portals into. As of Microsoft Ignite 2020, this is now known as Microsoft 365 Defender.
Buckle in and get ready for some knowledge, littered with acronyms.
Order of Operations
This blog layout will focus on each individual product separated into their own section. The section order will be in a numbered, suggested priority for those smaller teams that can only tackle one goal at a time. If your teams are bigger, you can obviously utilize this blog to implement products in parallel. While this blog will label the products in a 1 through 7 suggested ordering of priority, this is only my opinion. The most proper order should be what aligns with your business’s cybersecurity strategy and where gaps exist.
Instead of jumping around from product to product, each section will be dedicated to one product. Within each section, we will discuss what unlocks at the E5 level, what should be implemented in phase one for an immediate return on investment (ROI), and what you can plan for in phases two and three. This will provide you a full one year roadmap on applying most of what E5 has to offer and building out your ROI. The numbered order in each individual section is a guide to take things in a stepped approach. However, if you have the capabilities to run initiatives in parallel, that is suggested.
- Phase One: First 30 Days
- Phase Two: First 6 Months
- Phase Three: First Year
Instead of putting this into each individual section as a recommended task, be aware that a lot of these tools can feed into a syslog or Security Information and Event Management (SIEM) service. However, products like MDATP will require you to consistently generate new API keys. While many of these products are working their way into the new MTP Portal experience, you may want to send data to your SIEM instead or in conjunction with MTP.
1. Azure Active Directory (AAD) P2
Azure Active Directory, if an E3 customer, should already exist in your environment. For that purpose, I will not get into the value of implementing AAD as that should already be apparent to you. If you are someone reading this blog that has no Microsoft and are looking into doing it, I HIGHLY suggest AAD being your #1 priority, so that is why I have listed it first. On a side note and because Mark Morowczynski (A Microsoft Identity Principal Program Manager) will badger me if I don’t say this, please enable Password Hash Synchronization once you have AAD. Now that you are a Premium customer (P1 or P2), you can do password writeback. This is recommended, because your path of being all things Microsoft will lead you to Hybrid and/or AAD-Joined devices.
So what does AAD P2 enable for you once you purchase M365 E5?
Identity Protection and Privileged Identity Management.
Azure Active Directory Identity Protection (AADIP) is a tool that monitors the sign-in activities of your AAD environment and alerts you on identity-based risks. There are both user risks and sign-in risks. A Microsoft Docs page called “What is Risk?” does a great job explaining all of the risk detections in AADIP.
Privileged Identity Management (PIM) is a service that lets you utilize just-in-time and approved-based privileged access to Azure, O365, and Intune resources.
Phase One: First 30 Days
- Setup a User Risk Policy
In AADIP, you can enable actions based on when a user’s risk reaches a certain level. Determine your appetite for what the level and actions should be.
My recommendation? If the User Risk is High, set it to Allow Access but force a password change. This will only work best if you have Self-Service Password Reset (SSPR) enabled. As it will send them right into an SSPR workflow to securely authenticate and then change their password (which you will need the previously mentioned password writeback for). Another option is to just Block Access and the user cannot get in until you speak with them and then dismiss their risk (or commit a password change). A user’s risk will self-remediate if a password change occurs and AAD is aware of it. - Setup a Sign-in Risk Policy
Similar to a User Risk Policy, you can enable a sign-in risk policy that only effects the individual sign-ins. If you have Multi-Factor Authentication (MFA) enabled, the recommendation is to set this to Allow access, but MFA the sign-in at a specific risk threshold. You will need to determine if that is Low, Medium, or High. My recommendation is to MFA anything Medium or above. - Triage Risky Users
Ad infinitum. In fact, make the Risky Users blade of AADIP one of your browser home pages. Taking it further, there is even an option to send an email to specific users in AADIP every time a new Risky User appears. You can adjust the email to only send users at or above Low, Medium, or High. You will not believe what you were unaware of and you will be wondering what you got yourself into as these events start coming in.
Phase Two: First 6 Months
- PIM Role Assignment
Inside of PIM, you can apply Active and Eligible roles. An Active role is a permanent role whereas Eligible is a Just-in-Time (JIT) activation.
Apply the proper roles to the proper individuals, while following the principle of least privilege. Utilize Active roles at first for their needs. Where possible, give eligible roles for those where people only need JIT.
At first, you will want to enable PIM for Global Administrators. That is a quick win and the most critical role inside of Azure.
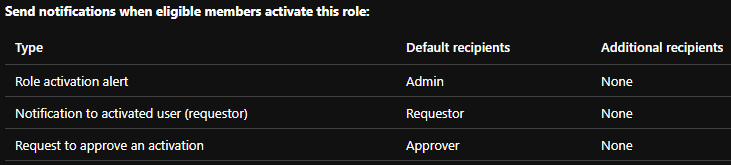
My recommendations are to configure the settings on those JIT roles so that eligible individuals have to give a justification when activating, enable sensitive roles to require Azure MFA (if in use) during activation, and setup eligible roles to notify via “Send notifications when eligible members activate this role” so that identified individuals get an email when a role is activated, providing auditing. Lastly, recommend setting a time of activation to a maximum of 8 hours (match full work day).

- Audit PIM Activations
As the emails come in from the notifications, audit why individuals are activating. This will help you understand the workflows that are ongoing in your environment and ensure individuals are committing actions relative to their responsibilities.
Phase Three: First Year
- PIM Access Review
Review the individuals assigned to an Active role and move them to an Eligible role. Active roles should be extremely minimal. Those roles like Global Administrator, Intune Administrator, and Exchange Administrator should not have anyone that is Active. In addition, review those with an Eligible role that are not using it to remove them. - PIM Setting Restricting
Review more of the settings within PIM and focus on restricting the configuration further. Things like reducing the hours an individual can be Active for can be a good long-term strategy. Review if you want to require approval by someone else any time someone activates.
2. Azure Advanced Threat Protection (Azure ATP)
As of Microsoft Ignite 2020, this product is now known as Microsoft Defender for Identity.
Azure ATP is an integration to your Active Directory environment that monitors activities to identify, detect, and investigate advanced threats, compromised identities, and malicious insider actions directed at your organization. It works by installing a sensor on Domain Controllers (DC’s) that send specific logs to the Microsoft cloud for analysis and alerting.
NOTE: Much of this is being integrated into MCAS as the Azure ATP portal will just be a part of MCAS and eventually MTP. So at the time of reading, you may notice screenshots don’t line up or exact steps aren’t necessary anymore.
Phase One: First 30 Days
- Installation
You will need to create your Azure ATP instance first. Then, you will need to connect Directory Services for this entire product to work. Finally and as previously mentioned, you need to install a sensor on your DC’s. It’s very quick and easy and data will start flowing in immediately. - MDATP Integration
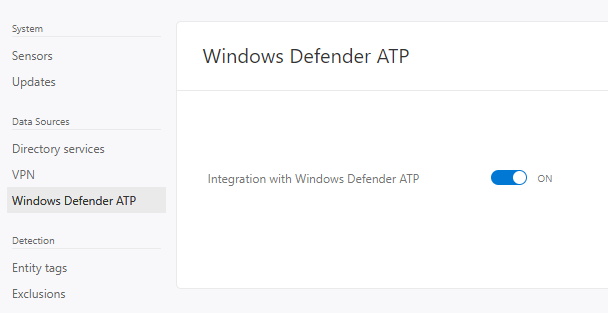
You will want to enable the MDATP integration, similar to how we have done throughout this entire blog.
- Exclusions
You will want to enable exclusions, specifically to those that your Vulnerability Management System (VMS) will absolutely create a lot of noise around.
I recommend configuring exclusions with the IP’s of your VMS scanners in the following Policies:- Network Mapping Reconnaissance (DNS)
- Remote Code Execution Attempt
- User and Group Membership Reconnaissance (SAMR)
Phase Two: First 6 Months
- Kerberos
Learn it. This isn’t meant to be funny. This is actually serious. Understanding Kerberos will help you better understand the alerts that appear. While Microsoft, and people like me providing feedback to the Azure ATP team :), have done their best to really make Azure ATP user and Tier 1 friendly, it will do so much more for you to know how Kerberos works. Just Google “Kerberos” and read, a lot.
If you don’t learn Kerberos, your first few alerts will certainly force you to learn it at a point you may not have the free time for.
- Health Alerts
If you get health alerts, you will need to triage them or the product may not be functioning. Stay on top of them. If needed due to a health alert, increase RAM of any DC’s being alerted about.
Phase Three: First Year
- Triage Alerts
Continue to triage alerts (which should be feeding into MCAS). Focus on fixing root causes and not just dismissing alerts. This product is great at finding configuration problems, especially of internal software. You may get a lot of noise, you may get nothing. You want to tune out the noise by fixing the root cause so when this product does alert to an actual event, you are ready to rock.
3. Office 365 Advanced Threat Protection (Office ATP)
As of Microsoft Ignite 2020, this product is now known as Microsoft Defender for Office 365.
Office ATP has a lot of crossover based on whichever plan you already had and what only E5 gives you. So, for this section, we will pretend that the scenario is an organization that was not on any of the ATP plans. Features like the Anti-Malware and Anti-Spam Policies are already present for Exchange customers with Exchange Online Protection (EOP). The Data Loss Prevention (DLP) Policies are present as well. Progression in these areas should exist at all times.
So what does Office ATP enable for you?
Technically, the only current feature available at E5 ONLY is Safe Documents. But Office ATP on several plans, has features like Safe Links, Safe Attachments, Automated Incident Response, Attack Simulator, Anti-Phish Policy, and more.
Phase One: First 30 Days
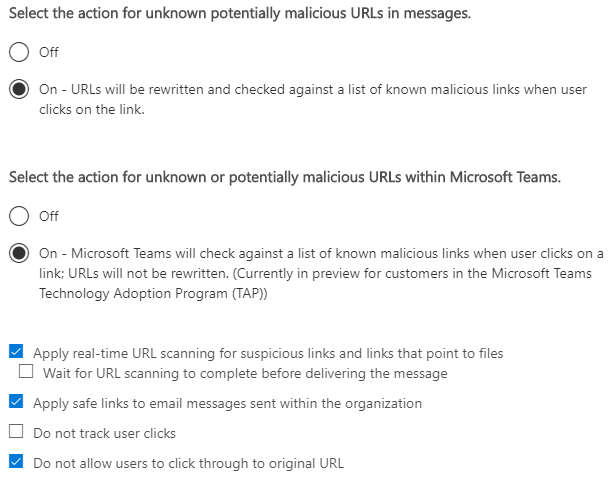
- Enable Safe Links
Safe Links is a feature that enables time-of-click verification on any URL’s within emails or Microsoft Office documents. In short, it checks the URL against known bad-URL’s and blocks access if it is a malicious link. It is important to note, however, that the first click of a URL anywhere in the world with Safe Links will always load. The URL has to be accessed once for Safe Links to scan.
My recommendation for the policy is as seen below. You can choose if you want to wait for URL scanning to complete before delivering and if you want to track user clicks. In my experience, we have seen zero false-positives with this product, so allowing to continue through is not recommended.
- Enable Safe Attachments
Safe Attachments is a feature which goes beyond signature-based detection that EOP has to protect against malware. Safe Attachments detonates attachments in virtualized environments to vet their intention and determine if they are malicious.
My recommendation is to enable Safe Attachments right into block mode if you are a company that wants to be bleeding edge and you’re on the small-medium business side of things. Skip monitoring and spending time that you don’t have auditing the results. It’s effective and it works. Just like Safe Links, I can’t remember any cases of false-positives. You can redirect to a mailbox if you like for malware/threat analysis or review for false-positives. If you want to be more cautious, there is the capability to run it in a Monitor mode. You can precede blocking by enabling Monitor mode first to see what would get caught and if there are any concerning false-positives.
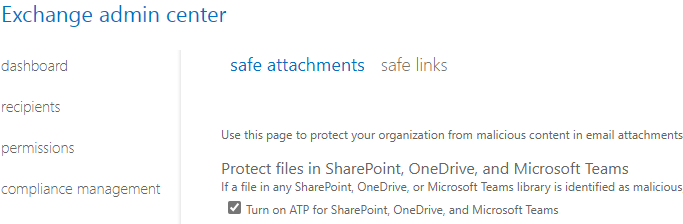
You will still need to go into the Exchange Admin Center while UI changes are being made to Turn on ATP for SharePoint, OneDrive, and Microsoft Teams.
Phase Two: First 6 Months
- Enable Anti-Phish Policy
The Anti-Phish Policy in Office ATP is meant to reduce the amount of phishing emails your end users receive.
The recommendation here is to enable some of the features but take time with the configuration changes as the false-positive rate has the potential to be noisy if you get too aggressive. I recommend pushing everything to quarantine and not junk. You need to train users to stop looking in Junk. They will not all tell you about issues and will just deal with it, no matter how much you ask for feedback and warn them that Junk is going away. Quarantine will let you release them for 30 days. Enable Domain Protection and Mailbox Intelligence, including the Mailbox Intelligence Impersonation Protection.
You will want to extremely limit trusted senders and domains to only consistent business processes that just keep being caught and won’t fix themselves. It is too risky to add beyond that as you are telling these policies to NEVER apply to those individuals or domains. If they get compromised, it will completely bypass these protections. - Enable Safe Documents
Safe Documents is a feature available in Office Version 2004 and above. This feature will open all documents opened with Office in Protected View and it will not allow exiting of Protected View of the document until MDATP has performed its analysis. The banners that users will see while Safe Documents is active and once finished can be seen here.
Enablement of this feature is also still in the Exchange Admin Center. It is not recommended to allow individuals to click through as they have already learned the habit of exiting Protected View over the years and will do so without reading any of the messages.

- Utilize Attack Simulator
Attack Simulator is a self-phishing platform that lets you phish your end users. This is only recommended if you don’t already have a phishing platform. It also does do attempted brute forcing and password sprays, a feature that can be utilized even if you have a phishing platform. The features for phishing, however, are very minimal and it is nowhere near as feature rich as some more matured phishing platforms, like the leaders in the industry – Barracude PhishLine, Proofpoint Security Awareness Training, Cofense PhishMe, and GoPhish (Open Source).
Phase Three: First Year
- Anti-Phish Policy Configurations
Focus on progressing the Anti-Phish Policy and getting to find that sweet spot between aggressive and minimal to no false-positives. Your goal should be to have most of the Impersonation settings turned on, all of the Spoof protections, and move the needle of Phishing Thresholds further than a 1. Goal should be 2 or 3. - Automated Incident Response
Automated Incident Response (AIR) is a feature that will kick off automated investigations when things like phishing emails are removed or Safe Links finds malicious links in an email. It will query your entire environment with multiple queries and locate similar entities. You can then manually triage those Alerts in the MTP portal or start using Security Playbooks to automate those queries. Be wary that this area of Microsoft is still being matured, so Playbooks are play-at-your-own-risk. Over time, this area will see a lot of maturity and more automation, keep yourself up-to-date on advancement within AIR.
4. Microsoft Defender Advanced Threat Protection (MDATP)
As of Microsoft Ignite 2020, this product is now known as Microsoft Defender for Endpoint.
MDATP is the NGAV + EDR platform provided by MS. It still utilizes Microsoft Defender built into Win10 OS to perform certain functions. If you are an E5 customer and are using another platform for NGAV + EDR, it is HIGHLY recommended that you test this product out and move to it. It has far exceeded expectations and is starting to dominate the market. Microsoft is investing heavily in this space and you can save those costs you’re paying to other platforms to cover your E5 expenditure. For those curious, privacy and storage concerns can be read about here.
But honestly, who is going to protect the OS better than the same company that makes the OS? It’s the first antivirus to ever be ran in a sandbox.
Phase One: First 30 Days
- Workstation Installation
MDATP isn’t a package that gets installed on a machine. It’s features that get unlocked with appropriate licensing (On all newer Windows 10 and Server Operating Systems), while also connecting you to the cloud platform for much of the analysis work.
The onboarding process for Windows 10 and prior to Windows 10 is well-documented. This will help guide you on getting it enabled on all current assets. For future assets, you can implement a script into the imaging process to onboard the device to MDATP. MDATP can now be onboarded to Mac and Linux systems as well. - Server Installation
Similar to workstations, there is an onboarding process for servers. You will need to be on Windows Server 2008 R2 SP1 or newer. Servers are a bit different than workstations as the older versions will require the Microsoft Monitoring Agent (MMA) to be installed. - MDATP Configuration
As devices are brought in, you will want to take advantage of Device Groups and Device Tags to appropriately assign Device Groups. It is recommended to create a Device Group for your workstations and one for your servers. You can assign tags during imaging by applying a registry setting. Keep in mind that you can only apply one tag this way, additional tags can be applied in the portal. Applying Device Groups will make it easier to adjust settings based on each group of assets instead of applying blanket policies.
Create Roles within MDATP to continue following the Principle of Least Privilege so that individuals only have rights to what they should be able to do and nothing else or only read access to areas of the portal.
Enable Automated Investigation and Live Response. Live Response lets you instantaneously generate a remote shell into the machine to start doing any investigation work with PowerShell.
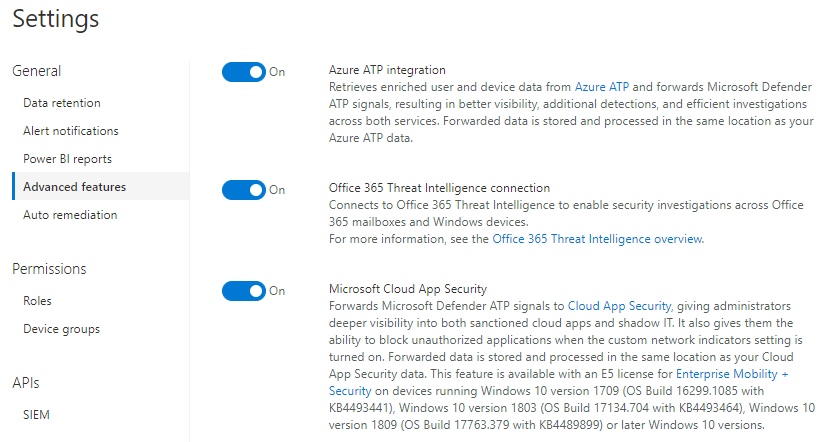
Enable the following: Azure ATP Integration, Office 365 Threat Intelligence connection, and Microsoft Cloud App Security connections. These will all help correlation with the other products in your E5 arsenal.
Phase Two: First 6 Months
- MDATP Advanced Features
Continue with the review of all configuration items in MDATP and adjust as business needs require and what you deem valuable.
One of the settings in Advanced Features is EDR Blocking. This is a post-breach protection that remediates artifacts that are detected. This is a feature you are going to want to turn on.
You’re going to want to look into enabling features like: Allow or Block File, Show User Details, Web Content Filtering, and more. - Auto-Remediation
Auto-Remediation is the ability to identify an automated Remediation Level that you can apply to Device Groups. This is where Device Groups come in handy so you can take time rolling out these features as your comfort allows. You ultimate goal should be to get to “Full – remediate threats automatically”.
Phase Three: First Year
- Advanced Hunting
Advanced Hunting lets you parse through the logs of data collected on the assets onboarded into MDATP. You can start creating custom queries that you can then move into Detection Rules and start alerting off of queries you have built. Look through the Shared Queries that are Suggested. Microsoft also maintains a GitHub with their Hunting Queries.
Here is an example query to show you all local administrator logins on assets in the last 30 days. You can filter this to only alert on a Device Tag that is applied to workstations and not servers.
// Users that logon with local admin rights summary
DeviceInfo
// Filter only on certain MDATP device tags, mainly to exclude IT workstations and servers
| where RegistryDeviceTag in ("INSERT TAG")
| join kind=inner
(
DeviceLogonEvents
//Filter out expected account names.
| where AccountName !hasprefix "INSERT PREFIX"
| where AccountName !in ("INSERT NAMES THAT INCLUDE")
| where InitiatingProcessCreationTime > ago(30d)
//Only show logins that are local admin
| where IsLocalAdmin == 1
)
on DeviceName
//Show fields we care about, utilize InitiatingProcessCreationTime to normalize the login activity.
| project DeviceName, AccountName , LogonType, Time=InitiatingProcessCreationTime
| summarize by Time, DeviceName, AccountName, LogonType
| sort by Time
- Threat and Vulnerability Management
Additional features, like Threat & Vulnerability Management are being built into the product. Chances are you have a Vulnerability Management System, so I won’t dig into those features, but they should be heavily compared to what you are already running.
Look through these capabilities and understand what MDATP is bringing visibility to on your assets.
5. Microsoft Cloud App Security (MCAS)
MCAS is a Cloud Access Security Broker (CASB). However, it integrates well into the Microsoft Software-as-a-Service (SaaS) architecture (obviously). The goal is to aid you in discovering what your assets are doing in regards to SaaS applications and discover that “Shadow IT” world.
Phase One: First 30 Days
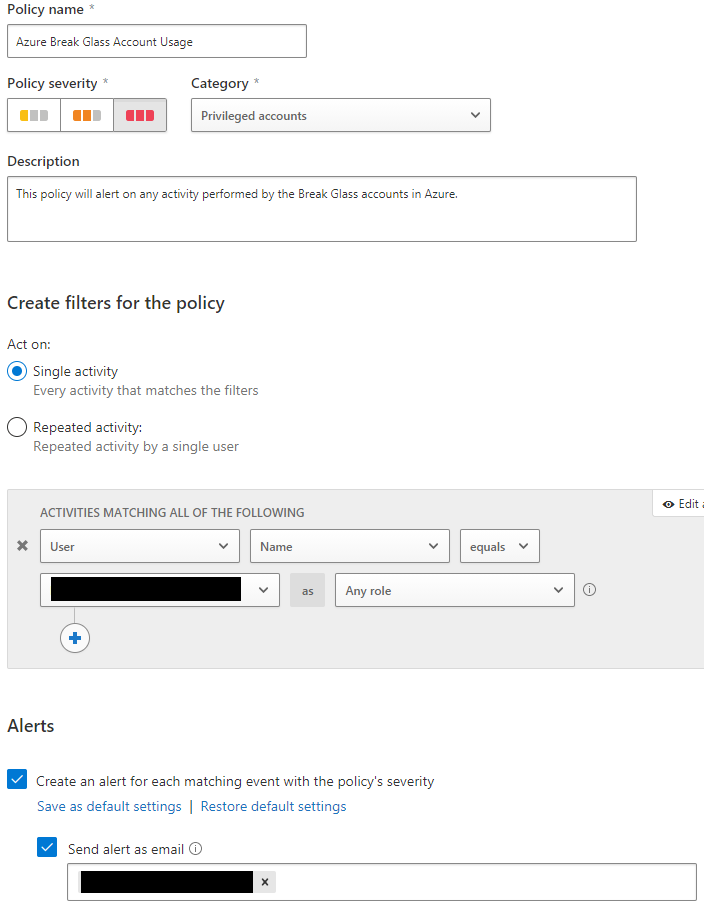
- Break-Glass Account Custom Policy
You have Break-Glass Accounts setup for Azure, correct? Good. You can use MCAS to alert when ANY activity is done on those accounts, and you should. If any activity is conducted on those accounts, it is an immediate fire alarm. Below is how you will want to setup this custom policy. Identify the account names where my image is censored the first time. Put in an email (ideally a distribution list or Office 365 Group) to alert when this policy matches and generates an Alert.
- MDATP, Azure ATP, and AADIP Integration
You can connect MDATP, Azure ATP, and AADIP to MCAS. This will allow for further enrichment of Policies and alerting capabilities. Connecting MDATP brings the biggest value add as you now enrich the Cloud Discovery Dashboard which gives you detailed insight into SaaS usage in your environment. Within Settings, Azure ATP and AADIP are just toggles that you turn on under the Threat Protection header.
Within the MCAS settings, check under Automatic Log Upload that MDATP is connected. The checkbox previously mentioned in the MDATP section enables this.

- User Enrichment
Within Settings, you will want to enable User Enrichment so that user identities show their Azure AD names.

- Policies
Policies are ways to create matching to activities that you can then alert on. Enable some out-of-the-box policies that are critical like most of the ones that are the category of Threat Detection. You can keep policies like impossible travel disabled since those are handled in AADIP. You don’t want to create too much noise with duplicated alerts across the separated platforms (MTP Portal is working to mature this).
Phase Two: First 6 Months
- Alert Triaging
Triage the alerts that have been coming in due to the policies you have enabled. But take it further and investigate root causes to why these activities are happening. Common events, however, are going to always be seen in MCAS because those are a part of normal workflows. Unfortunately, a lot of out-of-the-box alerts can’t be customized to exclude consistent workflows. - Cloud Discovery Dashboard
As MDATP assets are importing their data, the Cloud Discovery Dashboard becomes very enriched with what is happening in your environment. Review this dashboard and dig into reporting.
Phase Three: First Year
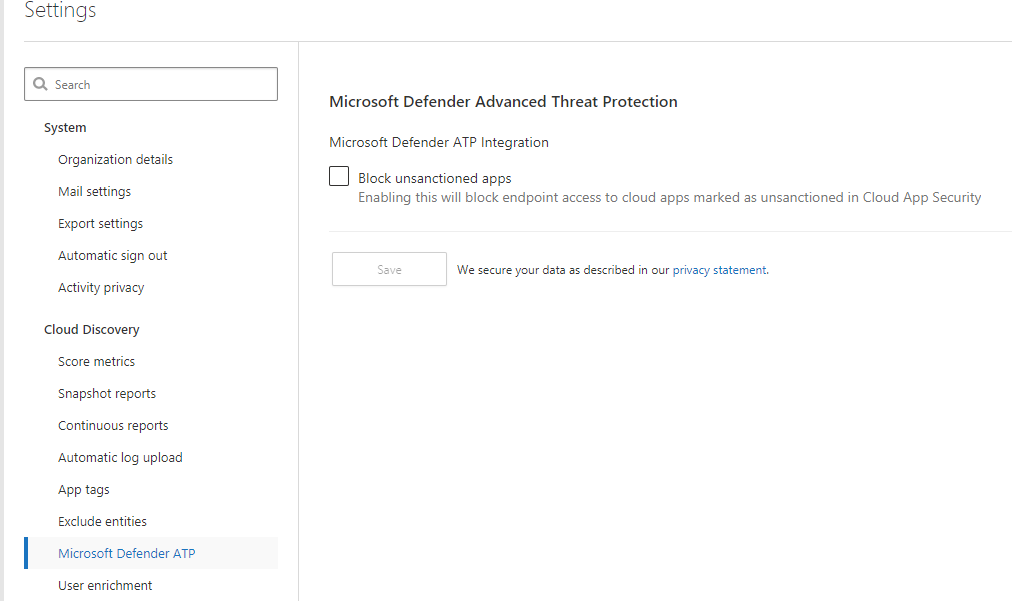
- Sanction/Unsanction Applications
Being a CASB, you can use MCAS to sanction and unsanction applications. MDATP can be utilized with MCAS to perform the blocking of those unsanctioned applications. You have to enable this feature in the MCAS Settings.
Review your applications in the Discovered Apps sections and utilize the scoring metrics to help you make determinations. You can click on the number listed under Users, IP Addresses, and Machines to drill into usage and investigate.
- Access, Activity, and Session Policies
You can create policies that enable real-time monitoring and control to applications based on numerous factors. For now, focus on Access Policies, Activity Policies, and Session Policies.
These are great to help you in your Data Loss Prevention endeavors. You can setup policies where interns can only login during working hours and while at the office. Another use case is restricting where files can be downloaded, such as only to company assets. - Firewall Integration
You can integrate firewall logs into MCAS to further enrich the Cloud Discovery Dashboard and data. Look into integrating firewalls to Cloud Discovery.
6. Azure Information Protection P2 (AIP)
Azure Information Protection P2 adds the features of automated and recommended classification, labeling, and protection, with policy-based rules and Hold Your Own Key (HYOK) configurations. A good tabled list can be seen here of the breakdown. AIP is a service inside of the Azure portal.
Phase One: First 30 Days
- Scan Data
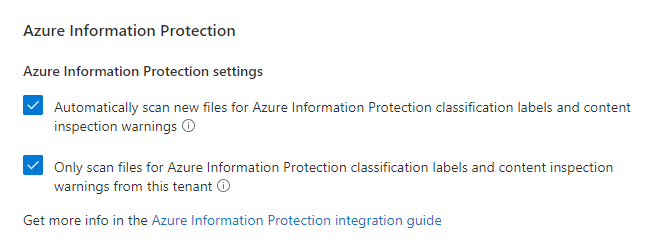
The AIP unified labeling scanner allows you to search your environment (through UNC paths or whatever is on SharePoint Server) to discover and/or classify specific data. Keep in mind that this does not run in real-time, you have to configure a cadence and it crawls during that scan window. If you want to scan M365 Online (SharePoint Online, OneDrive for Business, Teams, Office 365, etc.), you will have to utilize MCAS to do so.
Under the Settings in MCAS, there is an Azure Information Protection area that you will want to select the two boxes for. The top box starts the scanning. The bottom box says only review files in my tenant with my labels, not external labels from other companies. Similar to the unified labeling scanner, this does not run in a cadence. However, you can create a File Policy in MCAS to force MCAS to do a crawl of M365 Online data.
From there, you will review files under the Investigate > Files section of MCAS. You can filter on Classification Label in this area.
You will need to configure AIP Analytics in order for this entire process to work. Review the documentation and setup AIP Analytics.
Scan your environment in discovery only mode with your preferred configuration. Let that sit and run.
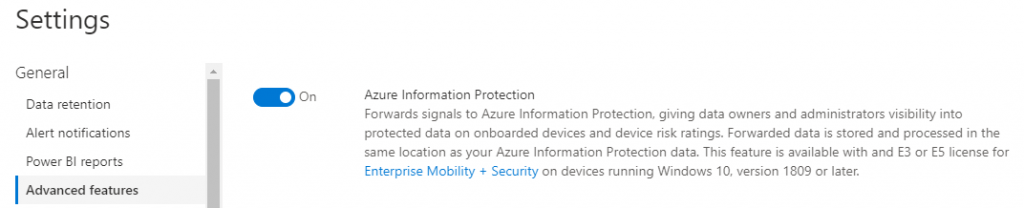
- Enable MDATP Scanning
You can send AIP information about files on workstations if they have MDATP installed. This information will feed into AIP and help you with your discoveries and potentially auto-classifications in a later phase.
In order to enable this, you have to turn on this the feature in MDATP’s Advanced Features section. This also will only work on Windows 10 version 1809 and above.
Phase Two: First 6 Months
- Review Scan Data
Now that your data has been consistently scanning, you can start reviewing the types of data that is being discovered. Parse the results to learn what type of data is in your environment. Look for the sensitive things like PII, HIPAA, or financial. Things that will get you in trouble. - Label Creation
Start creating labels for how you want to label your data (if this doesn’t already exist in your environment). You need to keep it small at first or else the initiative may fail due to overwhelming your users. Utilize your data discovery scanning to help determine what labels could be made to broadly apply to the largest use cases and that your users will want.
It would be wise to get Human Resources and Legal input during this process.
In addition to the creation of labels, you can also apply protection mechanisms to labels. These are things like not allowing specific labeled files to be printed or downloaded. Review the protections available in AIP and determine if you want those mechanisms applied to your labels. - Auto-Classification
With AIP, you can start auto-applying labels utilizing the scanners and integrations. This is recommended to do once you have matured your label implementation and no longer want your users having to manually apply labels. Review capabilities here and start auto-applying one label at a time as your comfort levels allow.
Ensure to run tests on this as your discovery may have lead you to realize you have to fine-tune the sensitivity of Microsoft labeling something a specific data type. For instance, it’s been discovered that something like U.S. Social Security Numbers is noticeably more accurate at 85%+ than at 75%+. That makes sense when looking at purely percentages, but the false-positive rate in testing shows that the 10% jump makes a significant difference.
Phase Three: First Year
- HYOK
This feature (HYOK) only applies to those utilizing the classic client. Those using the cloud and are looking to be future-built should be utilizing Azure Key Vault.
This feature focuses more on the organizations that have regulatory requirements around maintaining a key that is not in the cloud. If your organization does have those regulations, it is recommended to utilize this feature to comply.
7. Advanced Compliance (eDiscovery)
Advanced Compliance brings about several features that are not in the basic eDiscovery capabilities of Microsoft. eDiscovery and compliance features are a major key to ensuring any legal discoveries are properly handled and your own data is secure.
What does Advanced Compliance provide at E5?
Advanced eDiscovery, Customer Lockbox, Service Encryption with Customer Key, and Privileged Access Management.
Phase One: First 30 Days
- Customer Lockbox
The Customer Lockbox feature allows you to contain your data so that when Microsoft Support needs access, they must follow an approval process. This approval process also includes auditing. This feature is nice to ensure that a specific team is engaged on all Microsoft Support calls and when engineers are accessing data. This helps with compliance and privacy requirements, such as GDPR.
Focus on setting this up and designating Customer Lockbox Access Approver roles to those individuals who will be involved in the process. Part of the setup process is enabling administrator audit logging as well so you can have audit logs of what the Microsoft Support Engineer did during their troubleshooting process. Beyond this feature, you should absolutely setup as much audit logging inside of Azure as you can handle.
Phase Two: First 6 Months
- Advanced eDiscovery
The regular eDiscovery is like an advanced content search. But Advanced eDiscovery is like eDiscovery on steroids. It is eDiscovery but for all the things your Attorney needs. Ability to add custodians, track communications about legal hold notifications (including reminders and escalations), review processing errors, conduct searches, and then build review sets of those searches (choose what is relevant and not relevant).
Review the capabilities of Advanced eDiscovery with your eDiscovery managers and discuss implementation. This is exactly what your Attorneys will need to run cases. They’ve probably been asking you or have a full-time employee that just runs the old eDiscovery, downloads the data, and then imports it into a better eDiscovery tool. Now you can compare Advanced eDiscovery to that tool and see if you can flip to the Microsoft product on your roadmap.
Phase Three: First Year
- Service Encryption with Customer Key
This feature is another one focused on those clients that have regulatory or compliance requirements around controlling root keys. Similar to HYOK in AIP, this allows an organization to maintain the keys that encrypts data in Microsoft 365. This includes products like Exchange Online, SharePoint Online, OneDrive for Business, and Teams files.
If your organization has to meet these types of requirements, it is recommended to review this feature and your regulatory and compliance obligations. - Privileged Access Management
Microsoft PAM is a compliment to previously discussed PIM. While PIM is a JIT product, PAM is a just enough administration (JEA) product. This configuration gives users enough access to perform their workflows, without risking exposure of additional concerns, such as sensitive data or critical configuration settings.
A lot of organizations already have some type of PAM solution, so I won’t dig too deep into this area. Compare it with your current implementation or what you are looking to do from a PAM perspective.
To implement Microsoft PAM, you will need to create approver’s, enable which actions will require PAM to perform, and then create the access policy for those actions. From there, you will then build your workflows to incorporate PAM so that when an individual wants to perform an action, they will submit an access request and then get approved to do only that action. The action will then be locked out from just anyone being able to do it. It will send the user trying to perform the action through the PAM process.
This product is recommended for many areas of Azure, from things like deploying a new Azure Resource to making critical configuration changes that will impact the tenant.
As always, thank you for reading my blog. This was a long one, but I hope it was helpful. If you have any comments, concerns, or questions, please do leave a comment and lets have a conversation.
Edits
27 Sep 2020: Added the new names of all Microsoft products to their sections and in the beginning.
27 Sep 2020: Modified Microsoft Defender for Identity to a higher position in the priority list (Number 2 from Number 5).
Excellent guidance. I might suggest moving the Azure ATP deployment up tin the order, as if we’re talking about an environment that is already using ATA from the E3, license, it’s basically the “upgrade” from ATA to ATP and should be relatively simple (outside of the organizational change management) and will reduce load on Domain Controllers and eliminate infrastructure required for ATA. Since Identity is so important, the additional detections provided by ATP are critical and the detections will get better as the rest of the suite is enabled and integration activated.
This is very good input. I had a tough time determining where to put Azure ATP in this. Everything else sort of made sense from a logical order. I think Azure ATP can get implemented quickly and then you can spend time getting to the 6/12 month recommendations. If I had to redo this and taking a second look, I would agree to move it up. My original thoughts were getting in a lot of protections first since Azure ATP is an alerting tool and not a prevention tool.
Hi Frank,
Such a great effort and I can see the amount of time devoted to this, kudos mate, we’ll done.
I’d definitely agree with James, PLEASE get Azure ATP at the top, I have been impressed with it from day one and it has saved myself, and organizations that I work with more than once. We recently helped a customer that thought they might have a problem, we only had coverage of 6% of the DC’s and we had a smoking gun, a week later we were so lucky to get a high alert with the AD being exfil’d via SMB. Then the customer KNEW they had an issue.
Great post, keep up the good work as you’re on my list now 😎
This is one heck of an article, Frank! My colleague Julie Turner spotted it and recommended it for the Microsoft 365 Community Docs. Would you be game to include it?
Yes! Just would have to figure out where it fits and how to get it included.
I’m the admin of the repo, so we can make it happen. 🙂
If you go to the Discussions for the repo in GitHub and start a thread (you’ll need a GitHub account if you don’t have one), I can help you. Or, you can read the instructions in the README.
M.
Frank, awesome detailed blog post. Thanks for taking the time to provide customer guidance with regards to our M365 Security stack. On the compliance front, I believe there are a few more things our customer can do beyond lockbox & eDiscovery. For instance they could easily configure an Insider Risk Management policy during the first 30 days to detect data theft or data leaks (yes a bit bias since I’m a member of that engineering team), happy to have a follow call if needed.
Christophe,
Thank you for the feedback! I was not aware of these policies. I will have to review this. Thanks for letting us know!
For anyone that wants a link: https://docs.microsoft.com/en-us/microsoft-365/compliance/insider-risk-management?view=o365-worldwide
Great start and nicely articulated
Endpoint Data loss prevention is the recent addition to Microsoft portfolio
Great article Frank!
I would also suggest adding another element to the Azure ATP section, and that would be to review the identity security posture recommendations that get surfaced in the MCAS portal once ATP Azure ATP is up and running.
https://docs.microsoft.com/en-us/azure-advanced-threat-protection/isp-overview
These provide great insights into what are often previously unknown weaknesses.
Thanks for this.